Daikin Mini Split Remote Control Manual: A Comprehensive Guide
Welcome to the user manual for your Daikin Mini Split Remote! This guide provides detailed instructions for optimal operation, covering features and troubleshooting steps.
Understanding Your Daikin Remote

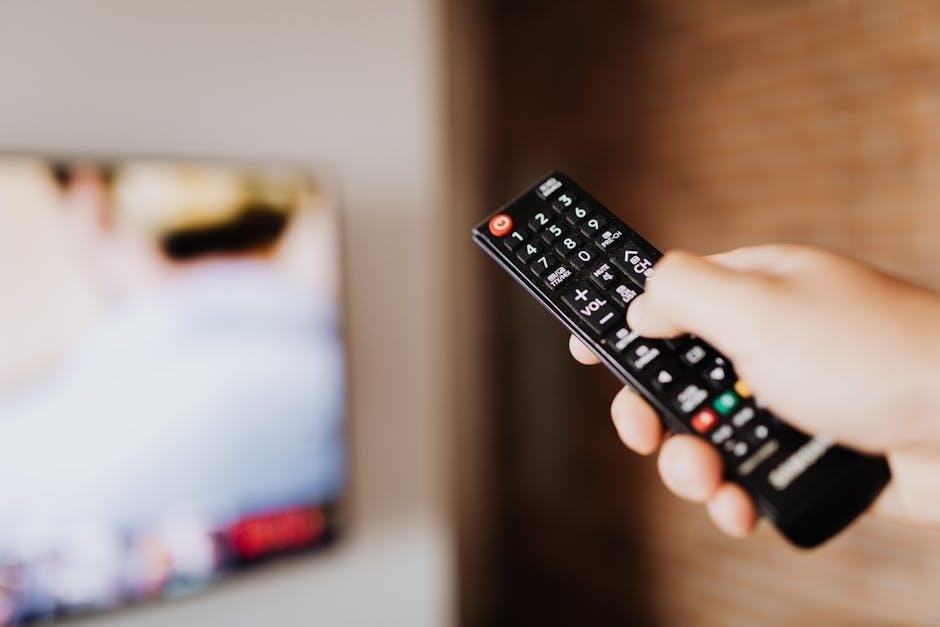
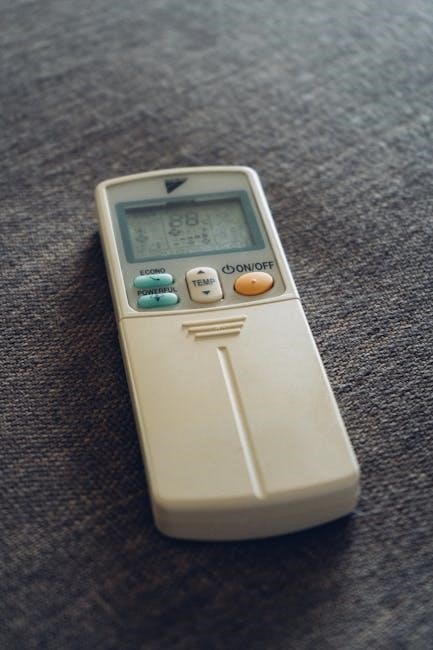
Your Daikin mini-split remote is the central command for controlling your indoor climate. It allows precise adjustments to temperature, fan speed, and operational modes, ensuring personalized comfort. Familiarizing yourself with its layout and functions is key to maximizing your system’s efficiency.
The remote typically features an LCD screen displaying current settings and error codes. Buttons are logically arranged for intuitive operation, including power, mode selection (cool, heat, auto, dry), temperature up/down, and fan speed control. Additional buttons manage timer functions, airflow direction, and advanced settings like energy-saving modes.
Understanding the symbols and indicators on the display will help you quickly interpret the remote’s status and make necessary adjustments. Proper use of your remote contributes to a comfortable and energy-efficient home environment.
Remote Control Models & Compatibility
Daikin offers a variety of remote control models designed for its mini-split systems. Compatibility depends on the specific Daikin unit you own, as different models utilize unique communication protocols. Common remote series include the BRC2327, BRC1E53, and newer smart remotes with Wi-Fi capabilities.
To ensure compatibility, always refer to your Daikin unit’s model number and consult the remote control’s specifications. Using an incompatible remote may result in limited functionality or complete non-operation. Daikin’s website provides a compatibility checker tool to assist in identifying the correct remote for your system.
Universal remotes can sometimes be programmed to work with Daikin units, but full functionality isn’t always guaranteed. Prioritize using a genuine Daikin remote for optimal performance and access to all features.
Key Functions & Buttons Explained
The Daikin remote control features an array of buttons controlling various functions. The ‘Power’ button initiates on/off operation, while ‘Mode’ cycles through cooling, heating, auto, dry, and fan-only settings. ‘Temp Up/Down’ adjusts the desired temperature. ‘Fan Speed’ controls airflow intensity – auto, low, medium, high, and sometimes a quiet mode.
The ‘Timer’ buttons enable setting schedules for automatic operation. ‘Swing’ adjusts the louvers for wider air distribution. ‘Economy’ or ‘Energy Saving’ mode optimizes power consumption. Additional buttons may include ‘Good Night’ for comfortable sleep and ‘Airflow Direction’ for precise control.
Understanding each button’s function is crucial for maximizing your Daikin mini-split’s efficiency and comfort.
Power & Mode Selection
The Power button, typically marked with a universal power symbol, turns the Daikin unit on and off. Pressing it once initiates operation; pressing again shuts it down. The ‘Mode’ button is central to controlling the system’s function. Cycling through this button allows selection between Cooling, providing chilled air; Heating, for warmth; Auto, which automatically selects heating or cooling based on temperature; Dry, for dehumidification; and Fan Only, circulating air without temperature adjustment.
Proper mode selection ensures optimal comfort and energy efficiency. Understanding each mode’s purpose is key to tailoring the system to your specific needs and preferences.
Temperature Control & Fan Speed
Temperature adjustment is managed via the ‘Up’ and ‘Down’ arrow buttons on your Daikin remote. Each press typically adjusts the set temperature by one degree Fahrenheit or Celsius, depending on your unit’s setting. The displayed temperature represents your desired room temperature, not the current ambient temperature.
Fan speed control is equally important for comfort. Buttons labeled ‘Fan Speed’ or with fan icons allow you to select from multiple speeds – Auto, Low, Medium, High, and sometimes a ‘Turbo’ mode for rapid cooling or heating. Auto adjusts fan speed based on temperature difference, while manual settings provide personalized airflow control.
Timer & Scheduling Features
Daikin remotes offer versatile timer functions, enabling automated operation for convenience and energy savings. The ‘Timer’ button initiates setting a delayed start or stop time; You can program the unit to turn on before you arrive home or automatically switch off during sleep.
Scheduling features, if available on your model, allow for more complex programming. This involves setting different temperatures and operating modes for various times of the day or days of the week. Explore the ‘Schedule’ or ‘Clock’ settings on your remote to access these advanced options. Proper timer and schedule setup optimizes comfort and reduces energy consumption.
Initial Setup & Pairing
Upon first use, your Daikin remote may require initial setup. This typically involves inserting batteries (see the ‘Battery Installation’ section) and ensuring the remote can communicate with the indoor unit. Most Daikin systems pair automatically, but some models might need manual pairing.
To initiate pairing, locate the ‘Pairing’ or ‘Connect’ button on either the remote or the indoor unit. Consult your specific model’s instructions for the exact procedure. A successful pairing is usually indicated by a confirmation message on the indoor unit’s display. If pairing fails, ensure there are no obstructions between the remote and the unit, and repeat the process.
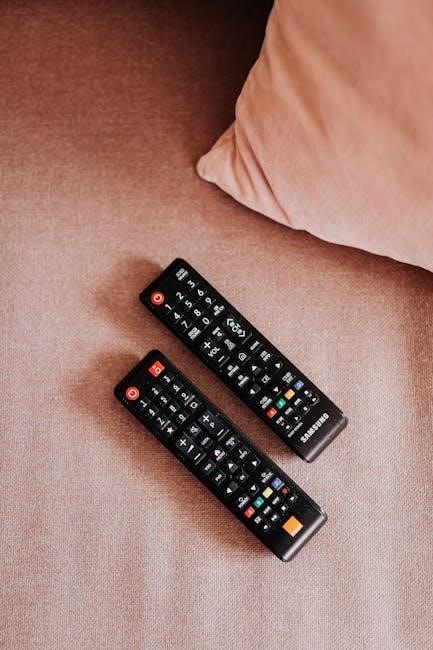
Battery Installation & Replacement
Proper battery installation is crucial for optimal remote control functionality. Most Daikin remotes require two AAA or AA batteries, depending on the model. Locate the battery compartment, usually on the back of the remote, and slide open the cover. Insert the batteries, ensuring correct polarity (+ and -) as indicated inside the compartment.
When replacing batteries, always use fresh batteries of the same type. Avoid mixing old and new batteries, or different battery brands. If the remote displays a low battery indicator or functions erratically, replace the batteries immediately. Dispose of used batteries responsibly, following local regulations.
Troubleshooting Common Issues
Encountering issues with your Daikin remote? Several common problems have straightforward solutions. If the remote isn’t responding, first check the batteries – ensure they are fresh and correctly installed. Aim the remote directly at the indoor unit’s receiver, avoiding obstructions. If the temperature display is incorrect, try resetting the remote or verifying the unit’s settings.
A malfunctioning timer often indicates incorrect programming or a low battery. Double-check the scheduled times and ensure the clock is set accurately. If problems persist, consult the full manual or Daikin’s support resources for more advanced troubleshooting steps and potential solutions.
Remote Not Responding
Is your Daikin remote failing to communicate with the unit? The most frequent cause is depleted batteries. Replace them with fresh ones, ensuring correct polarity. Next, verify there’s a clear line of sight between the remote and the indoor unit’s receiver – remove any obstructions. Dust or debris on the remote’s infrared emitter or the unit’s receiver can also interfere.
Try cleaning both surfaces gently with a soft, dry cloth. If the issue continues, attempt resetting the remote (refer to the ‘Resetting the Remote Control’ section). A faulty remote may require replacement; explore compatible options or universal remote programming.
Incorrect Temperature Display
Experiencing a temperature discrepancy on your Daikin remote? First, ensure the remote is set to the correct temperature scale – Celsius or Fahrenheit. Access the settings menu to verify and adjust if needed. Interference from direct sunlight or nearby heat sources can sometimes affect the remote’s sensor, leading to inaccurate readings.
Try relocating the remote to a cooler, shaded area. If the problem persists, the indoor unit’s temperature sensor might be malfunctioning. In this case, contact Daikin customer service for professional assistance. A consistent mismatch suggests a potential system issue requiring expert diagnosis and repair.
Timer Not Working
Is your Daikin mini-split’s timer failing to activate? Begin by confirming the timer is correctly programmed with the desired start and end times. Double-check the AM/PM settings to avoid confusion. Ensure the unit is set to a mode compatible with timer operation – typically ‘Auto’ or ‘Cool/Heat’. A power outage or interruption can sometimes reset the timer settings, requiring reprogramming.
Verify the remote’s batteries have sufficient charge, as low power can cause timer malfunctions. If the issue continues, a system error might be present. Consult the error code display (if applicable) or contact Daikin support for further troubleshooting guidance and potential solutions.
Advanced Features & Settings
Unlock the full potential of your Daikin mini-split with its advanced features! Explore ‘Energy Saving Mode’ to optimize power consumption without sacrificing comfort, intelligently adjusting cooling or heating output. ‘Good Night Mode’ gradually adjusts the temperature during sleep, promoting a restful environment. Utilize the ‘Sleep Function’ for personalized temperature settings throughout the night.
Fine-tune your comfort with precise ‘Airflow Direction Control’, directing air exactly where you need it. Some models offer customizable fan curves and quiet operation settings. Access these features through the remote’s menu, consulting your specific model’s manual for detailed instructions and optimal configuration.
Energy Saving Mode
Daikin’s Energy Saving Mode is designed to reduce power consumption while maintaining a comfortable environment. This intelligent feature subtly adjusts cooling or heating output based on room conditions and usage patterns. Activation typically involves pressing a dedicated button on your remote, often indicated by an ‘Eco’ or ‘Energy Save’ icon.
The system intelligently optimizes fan speed and compressor operation, minimizing energy waste without significant temperature fluctuations. While in Energy Saving Mode, you may notice a slight difference in cooling or heating intensity, but the overall comfort level remains consistent. Refer to your specific model’s manual for detailed settings and customization options within this mode.
Good Night Mode & Sleep Function
Daikin’s Good Night Mode and Sleep Function are designed to create a comfortable sleeping environment while maximizing energy efficiency. These features gradually adjust the temperature throughout the night, preventing drastic temperature swings that can disrupt sleep. Typically activated via a dedicated button on the remote, often symbolized by a moon icon, the system slowly increases the temperature in cooling mode or decreases it in heating mode.
The Sleep Function prioritizes maintaining a stable and comfortable temperature, while also reducing energy consumption. Some models allow customization of the temperature adjustment rate and duration. Consult your specific model’s manual for detailed settings and to understand how to personalize these sleep-enhancing features.
Airflow Direction Control
Daikin mini split systems offer precise airflow direction control, enhancing comfort and optimizing air distribution within a room. Using dedicated buttons on the remote – often labeled “Swing,” “Airflow,” or featuring directional arrows – you can adjust the vertical and horizontal vanes. This allows you to direct airflow upwards, downwards, or keep it fixed in a specific position.
Vertical swing distributes air throughout the room’s height, while horizontal swing broadens the coverage area; Some models feature a “3D airflow” function for even more comprehensive circulation. Proper airflow direction prevents drafts and ensures consistent temperature throughout the space, contributing to overall comfort and energy savings. Experiment with different settings to find what best suits your needs.

Cleaning & Maintenance
Regular cleaning is crucial for maintaining your Daikin mini split remote’s functionality and hygiene. Before cleaning, always remove the batteries to prevent accidental operation or damage. Use a soft, dry cloth to wipe the remote’s surface, removing dust and fingerprints. For stubborn dirt, lightly dampen the cloth with water, ensuring no liquid enters the remote’s internal components.
Avoid harsh chemicals, abrasive cleaners, or solvents, as these can damage the buttons and casing. Periodically check the battery compartment for corrosion and clean if necessary; Proper maintenance extends the remote’s lifespan and ensures accurate operation of your Daikin mini split system, contributing to efficient and reliable performance.
Resetting the Remote Control
Occasionally, your Daikin mini split remote may experience glitches or unresponsive behavior. Resetting the remote can often resolve these issues and restore normal functionality. The reset procedure typically involves removing the batteries from the remote control compartment. Press and hold the power button for approximately 30 seconds while the batteries are removed.
Reinsert the batteries and attempt to power on the remote. This process clears any stored settings or temporary errors. If the remote still doesn’t respond, repeat the process or consult the troubleshooting section of this manual. A reset doesn’t affect your Daikin unit’s settings, only the remote’s operational memory.
Understanding Error Codes Displayed on Remote
Your Daikin mini split remote control may display error codes to indicate issues with the indoor or outdoor unit. These codes are crucial for diagnosing problems and contacting support effectively. Common codes include “E1,” signaling a temperature sensor error, or “E5,” indicating a fan motor malfunction.
Refer to the detailed error code list in the full Daikin manual (available online) for a comprehensive explanation of each code and potential solutions. Note the specific code displayed and the circumstances when it appears. Do not attempt to repair the unit yourself; instead, contact a qualified technician with the error code information for accurate diagnosis and repair.
Replacing a Lost or Damaged Remote
If your Daikin mini split remote is lost or damaged, several options exist for replacement. First, determine your unit’s model number to ensure compatibility. You can find compatible replacements through the official Daikin website or authorized dealers. Alternatively, consider a universal remote control programmed to work with Daikin systems.
Programming a universal remote requires following the manufacturer’s instructions and inputting the correct code for Daikin. Be aware that universal remotes may not support all features of the original Daikin remote. Always verify the replacement remote’s functionality after installation to ensure proper operation of your mini split system.
Finding Compatible Replacements
Locating a compatible Daikin remote begins with identifying your mini-split unit’s specific model number. This crucial piece of information ensures you purchase a remote with the correct functionality. The Daikin official website is an excellent starting point, often listing compatible remotes directly. Authorized Daikin dealers can also assist in finding the right replacement.
Beyond official sources, reputable online retailers specializing in HVAC parts frequently stock Daikin remotes. When searching, carefully review product descriptions and compatibility lists; Cross-referencing the model number is vital. Consider purchasing from sellers with strong return policies, should the remote prove incompatible with your system.
Programming a Universal Remote
Utilizing a universal remote offers a cost-effective alternative to purchasing a genuine Daikin replacement. Begin by identifying the code for Daikin within the universal remote’s code list – often found in the remote’s manual or online. Inputting the correct code allows the universal remote to mimic the functions of your original Daikin remote.
The programming process typically involves entering a specific code while the universal remote is in programming mode. Follow the universal remote’s instructions precisely, as procedures vary between brands. Testing all functions – power, mode, temperature, fan speed – is crucial after programming to ensure full compatibility and proper operation with your Daikin mini-split system.
Daikin Mobile App Integration (If Applicable)
Many modern Daikin mini-split systems are compatible with the Daikin mobile app, offering remote control functionality from your smartphone or tablet. Download the app from your device’s app store and follow the on-screen instructions to connect it to your Daikin unit.
The app typically requires your unit to be connected to your home’s Wi-Fi network. Once connected, you can adjust temperature settings, change operating modes, set timers, and monitor energy consumption—essentially replicating all the functions of the physical remote control. This provides convenient control, even when you are away from home, enhancing comfort and energy efficiency.
Remote Control Safety Precautions
To ensure safe and reliable operation of your Daikin mini-split remote control, please adhere to the following precautions. Avoid exposing the remote to direct sunlight or extreme temperatures, as this can damage internal components. Do not disassemble or attempt to repair the remote yourself; contact a qualified technician for assistance.
Keep the remote dry and away from liquids to prevent electrical shock or malfunction. Avoid dropping the remote, as this can cause damage. Regularly check the battery compartment for corrosion and replace batteries promptly when low. Always use the correct type of batteries as specified in the manual, and dispose of used batteries responsibly.
Frequently Asked Questions (FAQ)
Q: My remote isn’t responding. First, ensure fresh batteries are installed correctly. If the issue persists, try resetting the remote (refer to the ‘Resetting the Remote Control’ section). Q: The temperature display seems inaccurate. Verify the unit is not in a direct heat source or draft. Recalibrate if necessary, consulting the full manual.
Q: Can I use a universal remote? Yes, but programming can be complex. Refer to your universal remote’s manual for Daikin compatibility codes. Q: Where can I find more detailed information? Visit the official Daikin website or contact their customer service for comprehensive support and troubleshooting guides.
Where to Find Additional Support & Resources
Daikin Website & Support Forums: The official Daikin website (daikin.com ― example link) offers a wealth of resources, including downloadable manuals, FAQs, and troubleshooting guides specific to your model. Explore their support forums for community-based assistance and shared solutions from other users experiencing similar issues with their remote controls.
Contacting Daikin Customer Service: For personalized support, reach out to Daikin’s customer service team via phone or email. Their knowledgeable representatives can provide expert guidance, answer specific questions, and assist with complex troubleshooting scenarios. Ensure you have your model number readily available for efficient assistance.
Daikin Website & Support Forums
Explore Daikin’s official website (daikin.com ― example link) for a comprehensive resource hub dedicated to your mini-split system and remote control. You’ll find downloadable user manuals in various formats, detailed product specifications, and frequently asked questions addressing common concerns. The website also features troubleshooting guides to help diagnose and resolve minor issues independently.
Engage with the Daikin community through their dedicated support forums. These forums provide a platform to connect with other users, share experiences, and seek advice from fellow Daikin owners. Search existing threads or post your own questions to receive valuable insights and potential solutions from the community.
Contacting Daikin Customer Service
For personalized assistance, Daikin offers multiple channels to connect with their dedicated customer service team. You can reach them via phone during business hours – check the Daikin website (daikin.com ― example link) for specific timings and the most current contact number for your region. Expect potentially longer wait times during peak seasons.
Alternatively, utilize Daikin’s online support form, available on their website, to submit detailed inquiries. Be prepared to provide your unit’s model number, serial number, and a clear description of the issue you’re experiencing with your remote control. A representative will respond via email within a specified timeframe, typically 24-48 business hours.